Using JQuery Selectors in CodedUI

CodedUI has come a long way in the last couple years especially when it comes to testing web applications.  However, even with the help of great frameworks like CUITe, it can still be difficult and slow for CodedUI to find controls on the web page.  

Thanks to recent improvements, you can more quickly and easily find controls by injecting Javascript into the page under test.  Even better, injected Javascript returns controls much more quickly than regular CodedUI searches. If you are loading JQuery on the page, this extension lets you find one or all controls that match a JQuery selector:

using System;
using System.Collections.Generic;
using System.Linq;
using System.Reflection;
using Microsoft.VisualStudio.TestTools.UITesting;

namespace TestingExtensions
{
    public static class JQueryExtensions
    {
        public static IEnumerable<T> FindControlsBySelector<T>(this BrowserWindow window, string selector)
        {
            var controlsBySelector = (IEnumerable<T>)window.ExecuteScript(string.Format("return $('{0}')", selector));
            return controlsBySelector;
        }

        public static T FindControlBySelector<T>(this BrowserWindow window, string selector)
        {
            object scriptResult = window.ExecuteScript(string.Format("return $('{0}')", selector));
            
            if(scriptResult == null)
                throw new InvalidFilterCriteriaException(string.Format("Could not find a control with the selector {0}", selector));
            bool isList = scriptResult.GetType() == typeof(List<object>);
            if (scriptResult.GetType() != typeof (T) && !isList)
                throw new InvalidCastException(string.Format("Incoming script result is not of type {0} - It is defined as {1} - with String of {2}", typeof (T).Name, scriptResult.GetType().Name, scriptResult));

            if (isList)
            {
                return (T) ((List<object>) scriptResult).First();
            }
            else
            {
                var controlBySelector = (T)scriptResult;
                return controlBySelector;    
            }
            
        }

    }
}

Use it like this:

myWindow.FindControlBySelector<HtmlSpan>("div.room.selected > span:not(span.check)");

When Green Fields Become Killing Fields

If you ever consider taking on a greenfield project to replace a working production system that, though it is a big ball of mud, continues to improve and runs on a reasonably modern OS such as Linux or Windows, weigh the risks carefully.  The legacy system has hundreds of useful features that will have to be recreated in the new software.  Think about how much effort has gone into the development of the legacy system.  Even if you believe the greenfield will do it faster, be realistic about how much faster.  For example, if the legacy system was developed over ten years, can you really deliver a better replacement in under two years or more than three times faster?   Consider also that your shiny new system will not be proven in production until it can get to production, which may add months to the end of the schedule or cost your business in lost productivity when the new system proves initially more unstable than the legacy system.  It is often better to take the resources you planned to dedicate to the re-write and use them to gradually carve off and replace pieces of the legacy system instead so that you end up with what you wanted in the first place: something just like the existing system but more reliable and easier to maintain.  It may take a little longer and cost a bit more, but it is actually far more likely to succeed because it delivers incremental business value along the way.

If you do decide to march across the greenfield anyway, please consider Pickett’s charge for an example of how deadly the combination of a beautiful greenfield and the illusion of quick victory can be.

On a sunny summer’s day on July 3, 1863, General George Pickett lead his men on an ill-fated march into history:

After the great guns fell silent, three divisions of resolute Confederate infantry, around 12,500 men, stepped out from the trees and formed battle ranks. Stretched out in a battle line over a mile long, with fixed bayonets and flags flying, the Southerners began their slow, determined march up towards Cemetery Ridge, three-quarters of a mile away. Waiting on top, the Union troops crouched behind stone walls, watching and holding their fire. When the Confederates were halfway across the intervening field, the Northern artillery opened up and began tearing great holes in the approaching lines. As the Southerners drew nearer, the Union infantry unleashed volley after volley of musket fire, mowing down the advancing enemy. Somehow the ragged lines kept reforming and on they came, despite the devastating carnage, quickening the pace and howling their “Rebel yell.”

— An account in the Philadelphia Enquirer

General Lee ordered the attack despite the reservations of his second in command, General Longstreet, because he felt the Union army would break under the assault, his army would march on to Washington and the war would be won.  Longstreet, on the other hand, had long ago come to the conclusion that new technology made assaults against entrenched defenders on better ground sheer folly.  He had watched as the Union had assaulted General Jackson’s strong defensive position at First Manassas back in 1861 only to be slaughtered by the thousands.  He did not want to see the Army of Virgina suffer a similar fate assaulting the hills of Gettysburg.  Instead, he suggested a flanking maneuver around the immobile Union defense so that the Confederates could take up a strong defensive position between the Union army and Washington thereby forcing what he believed would be a costly Union attack.  Lee, likely tired and sick, would have none of it.  He wanted to bring the war to an end and he thought his men would once again do the impossible.

History, in the form of the cannons of the Union army, ultimately proved Lee wrong.  Thousands were slaughtered as they marched bravely onward.  A contemporary Union newspaper account tells of the gruesome climax:

A few hundred Southerners, bravely led by General Lewis A. Armistead, breached the Union lines and briefly hoisted the Confederate flag on top of Cemetery Ridge before being overcome. The rest of the Southern troops could not even reach that point, and were forced to turn back.

Their battle-flag was planted boldly upon the crest and a shout went up from the demons who seemed to court death and destruction, but our lines swayed but for a moment; back they went, the ground was regained, and our lines again intact. At other points they succeeded in gaining temporary advantages, but ere they could realize their importance they were torn to pieces and hurled back upon their column, and so the column swayed until they could no longer get the troops to make a charge.

— An account in the Philadelphia Enquirer

Nobody knows what would have happened if Lee had listened to Longstreet that fateful day.  Perhaps the war would have dragged on even longer before the Union’s economic and population advantages ended up carrying the day.  Perhaps some European power would have stepped in to negotiate a peace with the Confederate states remaining independent.  The only certain thing is that the Confederates never again threatened ultimate victory despite fighting on for nearly another two years.


Brief Review of Macbook Pro with Retina for Windows Development

I recently made the switch from using a Windows box for my everyday development tasks to a Macbook Pro 15″ Retina.  I’ve gotten a few questions from Windows developers I know about things they’ve heard about blurry displays in Windows VMs, slow Mac performance when running VMs and other unpleasantness.  Another side question is whether it is best to use VMWare Fusion or Parellels.  I figured I’d take a minute to write down what I’ve learned while it is fresh in my mind.

I’ve been developing on Windows VMs for several years now.  I generally keep my productivity stuff in the host and put my development environment in the VM.  This lets me snapshot and restore the development environment easily.  It also lets me experiment with upgrades.  I always develop with multiple screens.  I used to insist on three when I was stuck with 1920×1080 but now that 27″ monitors featuring a resolution of 2560×1440 have become affordable, I am quite comfortable using the laptop as one screen and the 27″ as a second screen.  When I’m writing Windows code, the development VM runs full screen on the big monitor while I use the laptop screen from the host to look up documentation, handle email and do other office productivity tasks.  I usually give the development VM half of the host machine’s memory and CPU.  For the last couple years, my hosts have all been I7 quad cores with at least 16gb of RAM and the fastest SSD possible so VM performance has been snappy.  It’s not as fast as the host, especially when it comes to disk-intensive operations like compiling applications, but it is still faster than working directly on a host with a traditional hard drive.

I purchased a mid-2012 Macbook Pro with a 2.7Ghz I7, 16GB of Ram and a 750GB on board SSD in May of 2013.  I got some discounts since it was near the end of the product cycle, but it still cost about 20% more than a roughly equivalent 15″ laptop from Dell.  The Dell in question has a faster, 3.2Ghz processor and a smaller, 512GB SSD.  Like the Mac, it does not have a touch screen.  Of course, it also has a much lower resolution screen and is a bit heavier and thicker.  I’m not doing a comparison review here, but it is important to note that you pay a premium for the Mac’s design and you get significantly less in raw specs.  What you get in return is a far better user experience with a crisper display, a better, more usable touchpad and superior battery life.  I also purchased the Macbook because it is a better platform for work on things like Node.js since the underlying OS is a Unix derivative.

I first tried VMWare fusion.  It installed easily and guided me through the setup of a Windows 8 VM in minutes.  It starts out in a scaled mode that basically doubles pixels on the Retina display giving me a perfectly usable experience with sharp text in things like Visual Studio.  When I moved the VM to my 27″ monitor, the host re-scaled giving me more screen real estate while maintaining sharp text and graphics.  After I manually increased the guest’s memory to 8GB and gave it four cores, performance was a little better than what I was seeing when hosting on my big Windows desktop (3.06Ghz quad core I7, a fast SSD and 24GB of Ram).  Visual Studio running Reshaper with code analysis turned on performed well.  Compiling and running all the tests on my main work project was about 15% faster than what I was seeing in my old hosting environment.

I tried out VMWare’s Retina mode and that’s when things got a bit ugly.  The idea here is to let the Windows guest run at full resolution on the Retina display.  It looks crisp, but everything is just too small to read.  As recommended by VMWare, I turned up DPI settings in Windows and that’s when I started seeing the blurriness that some of my friends mentioned.  At 125% DPI, everything in Windows was sharp but still way to small for my taste.  At 150% DPI, menu bars and other navigational elements were barely big enough to use but I started noticing blurriness in graphical elements .  This is because Windows applications are not developed or tested to work at high DPI levels.  At 200% DPI, text was good, but things really started to break down.  For example, maximizing Chrome lost the title bar.   I probably could have gotten things working reasonably using 125% DPI and then tuning text sizes and zoom levels of various applications but it was just too much work.  Furthermore, turning up the DPI and font sizes in Windows made Windows applications appear way to large when running in Unity mode.

I had a couple gripes with VMWare Fusion.  Their choice of hot key mappings for Windows 8 has lots of annoyances.  Reaching for what you think should be search for applications shuts down the VM.  Unity mode, which lets you see host windows and guest windows side-by-side, is a little clunky.  On two occasions VMWare froze and forced me to reboot the host.

My experience with Parellels and Retina were about the same.  Setup was a bit easier.  Performance was a bit better especially on compiles.  The display modes were roughly equivalent with scaled mode the best choice when you are running with the laptop screen and an external, non-Retina, display.  Their side-by-side mode, coherence, is much nicer than the one in VMWare.  It never crashed on me.  Overall the app seems like a much better Mac citizen.  It costs more than VMWare, but the benefits made it worth the extra cost for me.

My bottom-line is simple: A Macbook with Retina running a Windows VM using Parellels is an excellent choice for Windows developers.  If you are interested in things like Node.js and even Javascript, it also gives you quicker and easier access to the best open source tools and libraries often long before they get ported to Windows.  The hardware is a little pricey, but the value you get is well worth the extra cost.


ASP.NET MVC URLs for Knockout (and other MV-something Javascript Frameworks)

Here’s a way to pass ASP.NET MVC URLs to your Knockout models from an ASP.NET MVC application via HTML configuration instead of global Javascript variables. It also works with any of the other MV-something Javascript frameworks, like AngularJS, and plain Javascript. The key here is the Javascript does not have to know how to build MVC URLs. Instead, MVC is used to configure the URL that is used by Javascript.

First the view:

<div id="myForm" data-search-url='@Url.Action("Action", "Controller", new {area="optionalArea"})'>
<!-- form with bindings to the Knockout model -->
</div>

Here’s an AJAX post:

$.ajax({
  type: "POST",
  url: $("#myform").data("search-url"),
  contentType: 'application/json; charset=utf-8',
  //postData is a Javascript object with properties matching those of the .NET objet
  data: ko.toJSON(postData),
  success: function (data) {
    //handle response
  }
  error: function(xhr, ajaxOptions, thrownError) {
    //error handling
  }
});

If the MVC route expects parameters in the query string, an AJAX get is also straightforward:

$.ajax({
  type: "GET",
  url: $("#myform").data("search-url"),
  contentType: 'application/json; charset=utf-8',
  //query string here is ?name1=value1&name2=value2
  data: {name1: value1, name2: value2},
  success: function (data) {
    //handle response
  }
  error: function(xhr, ajaxOptions, thrownError) {
    //error handling
  }
});

You can also handle more complex routing schemes by putting placeholders in the data attribute on the view side and using replace on the Javascript side to set the parameters. For example, imagine we want a URL like “/area/controller/action/{id}”. In that case, the view would look like this:

<div id="myForm" data-search-url='@Url.Action("Action", "Controller", new {area="optionalArea", id="_id_"})'>
<!-- form with bindings to the Knockout model -->
</div>

And the AJAX call:

$.ajax({
  type: "GET",
  url: $("#myform").data("search-url").replace("_id_", idFromModel),
  contentType: 'application/json; charset=utf-8',
  success: function (data) {
    //handle response
  }
  error: function(xhr, ajaxOptions, thrownError) {
    //error handling
  }
});

The beauty of this approach is it relies completely on MVC for the format of the URL. There are absolutely no assumptions in the Javascript about the routing scheme.

Upgrading a Windows EC2 Instance to a Different Instance Type With Provisioned IOPS

Amazon EC2 just keeps getting better (and cheaper).  They are constantly improving capabilities and tools to make what used to hard easy.

Yesterday, I had to upgrade the test database server as part of a story to improve the performance of our web application.  The DBA had put the database server on a high-memory extra large instance (m2.xlarge) without realizing that that instance type offers what Amazon calls “moderate I/O”.  That instance type has highly variable I/O performance, which caused quite of bit of frustration during demos and tests.  My job for this story was to eliminate the I/O variability so users would see good, consistent performance under normal conditions.  The environment in question is not used for load testing so the server did not have to be sized for full production loads.

My Original Plan

I sketched out the following steps to perform the upgrade:

  1. Backup the databases to S3
  2. Spin up a new extra large instance (m1/xLarge) with support for provisioned IOPS
  3. Setup an EBS volume for the databases with provisioned IOPS and attach it to the instance
  4. Install Windows Updates on the instance
  5. Install SQL Server 2008 R2 and all service packs
  6. Restore the databases
  7. Change the web connection strings to point at the new database server
  8. Test the application.
  9. Change my nightly start and stop scripts to start and stop the new database server (this environment only runs from 7am until 6pm on working days)

I estimated this would take a two to four hours of time. Much of the time would be spent waiting for updates and SQL Server to install.

Faster Upgrade In Place

Before I started, I checked to see if there was an easier way. Thanks to recent improvements in the EC2 tooling, there is.  Here are the actual steps I followed:

  1. Backup the databases to S3 in case something goes wrong
  2. Stop the instance
  3. Record the attachment information and availability zone for the EBS data volume
  4. Upgrade the database instance to m1.xlarge with support for provisioned IOPS
  5. Take a snapshot of the data drive
  6. Create a new EBS volume with provisioned IOPS from the snapshot in the availability zone recorded in step 3
  7. Detach the old EBS volume from the instance
  8. Attach the new EBS volume to the instance using the device and availability zone recorded in step 3

Using this procedure, it took me about 30 minutes to upgrade the server.  Let’s run through the steps in more detail.

Steps in More Detail

  1. Backup the databases to S3 in case something goes wrong

Use SQL Server Management Studio to backup the databases locally.  Zip the backups and use the EC2 Management Console to move the zip to an S3 bucket.

  1. Stop the instance

Select the instance in the EC2 Management Console and use the Action menu to stop the instance.

  1. Record the attachment information and availability zone for the EBS data volume

Select Volumes in the left-hand menu in the EC2 Management Console.  Select your volume and record the zone and attachment information shown in the lower-right portion of the screen.

EC2Figure0

  1. Upgrade the database instance to m1.xlarge with support for provisioned IOPS

Go to the EC2 Management Console, select the instance, pull down the action menu and select “Change Instance Type”.

EC2Figure1

In the Change Instance Type dialog, set the appropriate instance type and check the box to supported provisioned IOPS on the instance.  Press the “Yes, Change” button to upgrade the instance.

EC2Figure2

  1. Take a snapshot of the data drive

Select Volumes in the left-hand menu in the EC2 Management Console.  Select your volume, pull down the Action menu and select “Create Snapshot”.

EC2Figure3

Create the snapshot with a meaningful name.

EC2Figure4

  1. Create an EBS volume with provisioned IOPS from the snapshot in the availability zone recorded in step 3

Select Snapshots in the left-hand menu in the EC2 Management Console.  Search for the name of the snapshot you created in the previous step.  Select the snapshot and click on the “Create Volume” button.  This pops up the “Create Volume” dialog.

Select the desired IOPS level.  Note that IOPS cannot exceed ten times your volume size in gigabytes and must not exceed the maximum IOPS allowed for the instance type (e.g 1000 for m1.xlarge).  For example, the maximum provisioned IOPS for the 40GB drive in this example is 400.  You can increase the size of the volume if you need a greater level of provisioned IOPS.  Windows will see any additional space on the volume as unallocated.

Set the availability zone to the one your recorded from the original volume settings.
EC2Figure6
Press “Yes, Create” to create the volume.

  1. Detach the old EBS volume from the instance

Select Volumes in the left-hand menu in the EC2 Management Console.  Select your old volume, pull down the Action menu and select “Detach Volume”.

EC2Figure7

  1. Attach the new EBS volume to the instance using the device and availability zone recorded in step 3

Select Volumes in the left-hand menu in the EC2 Management Console.  Select your new volume, pull down the Action menu and select “Attach Volume” to bring up the “Attach Volume” dialog.

EC2Figure8

Set the device to the one your recorded from your old volume settings and press “Yes, Attach” to attach the volume

EC2Figure9

Making ASP.NET MVC Windows Authentication With Role-Based Security Painless for Developers

I’ve always been a bit of a Windows Authentication hater for all the wrong reasons.  If I want to change my roles, I have to change my group memberships in Active Directory.  The network administrator never wants to give me access so I have to make a request and wait.  In the alternative, I can get a number of different users setup and logon to the computer as one of them every time I want to test different security settings.  If my development box is not part of the domain, I can manipulate my local security settings, but that is not always an option either.  I can also set things up so my account doesn’t have access to the application.  This way I “simply” type in the credentials of the user I want to test under each time I fire up the web application. It is just painful to work with Windows Authentication on a developer box

Unfortunately, my current team has to deal with Windows Authentication on our current project and was running into these headaches on a daily basis.  I finally put together a simple solution that swaps in a configuration-based GenericPrincipal for developers that allows them to set up any role memberships they want locally without impacting Active Directory or the server deployment environment.  It’s all controlled from a single configuration setting contained in the appSettings section of the web.config:

<!-- Comma-delimited list of roles to be used in development environment (Windows authentication off).-->
<add key="Roles" value="AutobahnAdministrators" />

If the configuration key is present, the AutenticateRequest event in global.asax injects a GenericPrincipal with the configured role memberships:

protected void Application_AuthenticateRequest(object sender, EventArgs e)
{
    var roles = ConfigurationManager.AppSettings["Roles"];
    if (!string.IsNullOrEmpty(roles))
    {
        var genericIdentity = new GenericIdentity("developer");
        HttpContext.Current.User = new GenericPrincipal(genericIdentity, roles.Split(','));
    }
}

Optional — Allow IoC Container to Inject Correct IPrincipal

Our team uses Castle Windsor to inject an IPrincipal into our controllers to perform role checks. This allows us to avoid directly accessing the HttpContext, which makes unit testing much easier. I’m sure the code below could be adapted to work with any of the popular IoC libraries.

public class Installer : IWindsorInstaller
{
    protected override void RegisterComponents(IWindsorContainer container, IConfigurationStore store)
    {
        //This allows us to inject an IPrincipal into any controller.
        //Will be based on configuration if:
        //  1) Anonymous authentication is enabled (Windows authentication is disabled)
        //  2) AppSettings["Roles"] is a comma-delimited list of roles to assign
        //
        // Throws exception if anonymous authentication is in use and AppSettings/@key=Roles is not configured
        container.Register(Component.For().UsingFactoryMethod((kernel, creationContext) =>
            {
                //if this is a generic principal, it was injected based on the configuration so we can just use it
                if (HttpContext.Current.User is GenericPrincipal)
                {
                    return HttpContext.Current.User;
                }
                //This is only used in integration test scenarios using the container.  If you are running the web app, the proper generic identity from the web.config was injected in global.asax AuthenticateRequest()
                var roles = ConfigurationManager.AppSettings["Roles"];
                if (!string.IsNullOrEmpty(roles))
                {
                    return new GenericPrincipal(new GenericIdentity("developer"), roles.Split(','));
                }

                //if there is not configuration and this is a windows principal, then just return it
                if (HttpContext.Current.User is WindowsPrincipal)
                {
                    return HttpContext.Current.User;
                }

                throw new HttpException(401, "Windows authentication must be on or AppSettings/@key=Roles must be configured");
            }).LifestylePerWebRequest());
    }
}

One Stupid (but Necessary) NHibernate Hack

When NHibernate with Fluent NHibernate work, it’s a beautiful thing.  They almost make building applications that use a relational database painless.  However, sometimes you run into something that costs a couple of developers the better part of a day and it makes you want to scream.  The team I’m on had one of those days as a result of trying to refactor our database to fit better with our business instead of NHibernate.

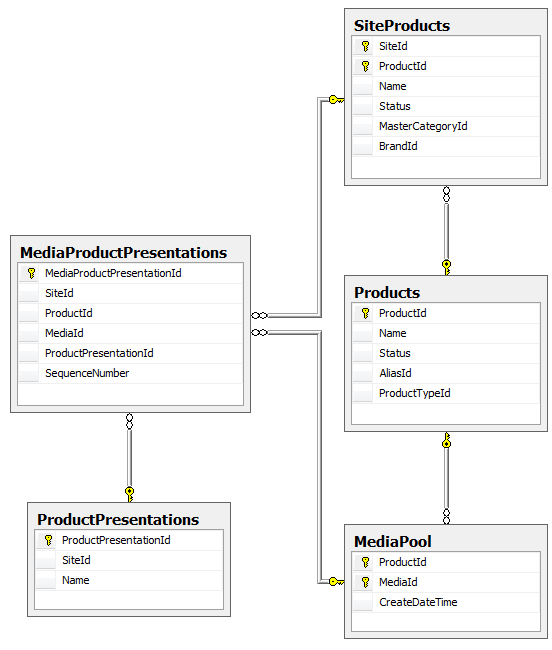
Here’s a portion of our original database structure:

diagram_old
The changes we wanted to make fell into two categories. First, we wanted to rename some tables to better align with the business vocabulary.  For example, the table ProductMedia would become MediaPool because that’s what marketing called it.  The second change turned out to be more problematic.

Houston, We Have a Problem

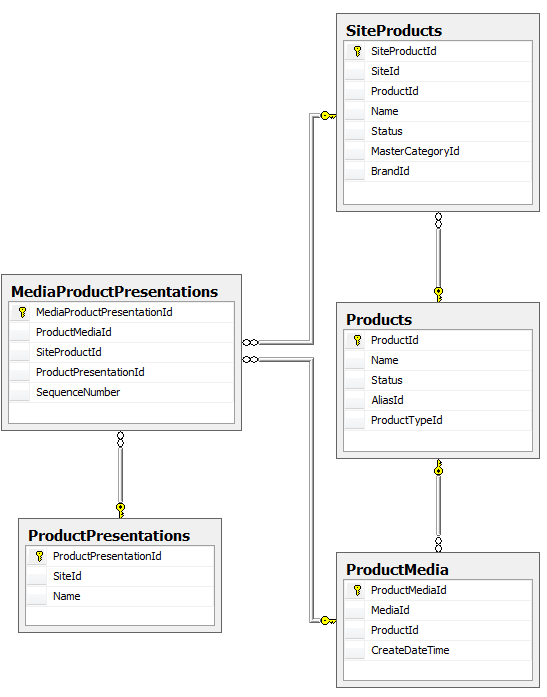
Some of our entities actually represent the relationship between two other entities.  For example, we have a SiteProduct that represents a Product on a Site.  When we first designed the database, we setup the relationship entites with a single field surrogate key: A unique, automatically generated ID that only exists to serve the database.  The problem was it had no meaning to the business so our screens tended to know the SiteId and the ProductId but not the SiteProductId.  This forced us to constantly join or lookup the SiteProduct table to get the SiteProductId so we could get to the data we needed to perform work.  We wanted to eliminate those surrogate keys and use the combination of SiteId and ProductId as a composite key instead.  We had similar circumstances in a couple of other relationship tables that we also wanted to improve.  We ended up with this:

diagram_new

After reworking our entities and Fluent NHibernate maps to mirror our new structure, we ran into the following rather cryptic exception when running our unit test suite against SQLLite:

System.ArgumentOutOfRangeException : Index was out of range. Must be non-negative and less than the size of the collection. Parameter name: index

The problem was maps like this one:

public class MediaProductPresentationMap : ClassMap
{
    public MediaProductPresentationMap()
    {
        Table("MediaProductPresentations");
        Id(x => x.Id, "MediaProductPresentationId").GeneratedBy.Identity().UnsavedValue(0);
        Map(x => x.SequenceNumber).Not.Nullable();
        References(x => x.Presentation, "ProductPresentationId").Not.Nullable().Cascade.None();
        References(x => x.MediaInPool).Columns("MediaId", "ProductId").Not.Nullable().Cascade.None();
        References(x => x.SiteProduct).Columns("SiteId", "ProductId").Not.Nullable().Cascade.None();
    }
}

Notice that ProductId is one component of the composite key for MediaInPool and one component of the composite key for SiteProduct.  As it turns out, NHibernate simply cannot deal with one field being mapped twice.  The only work around mentioned anywhere is to make at least one of the references read only.  Unfortunately, that doesn’t work in this case because each of the keys consists of two fields.  If we make the reference to MediaInPool read only, the MediaId does not get set and the insert fails;  If we make the SiteProduct reference read only, the insert fails with a null SiteId.

A couple members of the team looked for solutions all afternoon.  I got involved as well and we just could not find a good answer.  After dinner, I sat down and examined the issue one more time and came up with a bit of a hack to solve the problem.  The application needed NHibernate to set all the ID fields when inserting a new MediaProductPresentation.  It also needed to be able to traverse the references when reading.  However, since the MediaInPool and SiteProduct already exist before the application tries to add a MediaProductPresentation, the references could be read only as long as there was another way to tell NHibernate to update those ID fields.

The Solution

The solution required changes to both the entity and the map.  First the entity:

public class MediaProductPresentation
{
    public virtual string Id { get; set; }
    public virtual SiteProduct SiteProduct { get; set; }
    public virtual ProductPresentation Presentation { get; set; }
    public virtual MediaInPool MediaInPool { get; set; }
    public virtual int SequenceNumber { get; set; }
    public virtual int MediaId { get { return MediaInPool.Media.Id; } protected set { } }

    /// These two properties exist solely to support NH persistence. On a save, these are the ones that are actually persisted in the NH map.
    /// They should not ever need to be exposed to other classes.
    protected internal virtual int SiteId { get { return SiteProduct.SiteId; } protected set { } }
    protected internal virtual int ProductId { get { return SiteProduct.ProductId; } protected set { } }

    protected MediaProductPresentation() {}

    public MediaProductPresentation(SiteProduct siteProduct, ProductPresentation presentation, MediaInPool mediaInPool, int sequenceNumber)
    {
        SiteProduct = siteProduct;
        Presentation = presentation;
        MediaInPool = mediaInPool;
        SequenceNumber = sequenceNumber;
    }
}

The entity has both objects to represent the references for the read case (e.g. SiteProduct) and ID fields for the references to support the write case (e.g. SiteId, ProductId). The ID fields use a clever pattern taught to me by one of my colleagues, Tim Coonfield. Although NHibernate can see them, other classes in the application cannot.

With the entity setup correctly, the map is easy though it looks a little strange:

public class MediaProductPresentationMap : ClassMap
{
    public MediaProductPresentationMap()
    {
        Table("MediaProductPresentations");
        Id(x => x.Id, "MediaProductPresentationId").GeneratedBy.Identity().UnsavedValue(0);
        Map(x => x.SequenceNumber).Not.Nullable();
        Map(x => x.ProductId).Not.Nullable();
        Map(x => x.MediaId).Not.Nullable();
        Map(x => x.SiteId).Not.Nullable();
        References(x => x.Presentation, "ProductPresentationId").Not.Nullable().Cascade.None();
        References(x => x.MediaInPool).Columns("MediaId", "ProductId").Not.Nullable().Cascade.None().Not.Insert().Not.Update().ReadOnly();
        References(x => x.SiteProduct).Columns("SiteId", "ProductId").Not.Nullable().Cascade.None().Not.Insert().Not.Update().ReadOnly();
    }
}

The map tells NHibernate to ignore the object references when inserting or updating. Instead, NHibernate sets the various foreign key reference IDs directly.

It May Not be Pretty, But It Works

It’s a shame that NHibernate is not smart enough to reference multiple tables that share common elements in their composite keys. As our data architect put it, this is why almost everybody that uses NHibernate sticks to single field keys and uses surrogate keys on relationship tables. This work around makes it possible to use composite keys where they make sense without fear. I know it’s not exactly beautiful, but, at least for us, it was a small price to pay to have the database structure align better with the business.

Why My Team Gave Up on NCover4

This is the third of several posts based on my experience using NCover4 on a large, new development project.  Click here to see all the updates in order.

After struggling with problems caused by NCover4 for nearly a year, my team finally gave up on it on New Year’s Eve.  The writing was on the wall for a couple of weeks.  NCover4 Code Central had gotten so slow that it was completely unusable.  Chrome would pop up a dialog saying the server was unresponsive with buttons to kill or wait on the extremely long running request.  Trying to delete history was impossible because it would take 30 minutes plus from the time you pressed the button to delete one 25 record page of history to the time when the screen was ready to delete another.  Support recommended an index fix utility that ended up running in excess of 12 hours that did improve things a little.  Unfortunately, it still took up to a minute or two to draw one page of results and deletes still took 30 minutes per page.

After looking at the resources NCover4 was using, I moved its data onto a dedicated raid-0 array on our Amazon EC2 server, which roughly tripled the available I/O performance.  This dropped screen redraws to a still unacceptable 30 seconds to 1 minute.  It did not have any measurable impact on delete performance.

The final straw was intermittent test failures at the build server caused by NCover4 hogging resources for 15 – 20 minutes after the completion of the previous build.  If a build started too soon after the previous one finished, some tests involving an in-memory RavenDB would timeout waiting for stale indexes to update.  The second build would also take nearly three times as long as the first thanks to the load put on the server by NCover4.

After discussing the issue with the team, we pulled the plug on New Year’s Eve.  I spent an hour switching us over to JetBrains DotCover.  Although it does not offer the breadth of statistics that NCover4 does and has its flaws, it provides access to the basic code coverage metrics needed to identify and fix poorly covered code.  It is less expensive than NCover4 on the desktop, and, if you use TeamCity, it is free on the build server.  It puts less load on the server as evidenced by a 20% drop in build times.  It does not cause any of our tests to fail even when running builds back-to-back.  Because it is built into TeamCity, it is quite easy to integrate with the build process.  TeamCity also has a nice page that shows trends over time:

Image

The folks at NCover are working to improve performance.  They plan to add automatic history archiving to cut down on the amount of data that needs to be processed to draw their overview graphs.  They also plan to cache the coverage statistics they currently calculate for each page to cut down on the CPU load.  A release including these improvements is expected soon.  However, my team is pushing towards our release and we no longer have time to risk on something we are not sure is production ready.  Therefore, we’re going to stick with DotCover at least until Q4 of this year.  Even after that, NCover4 would have to be substantially better to justify the investment in time and money it would take to switch back.  I cannot recommend NCover4 for any team on any project at this time.